Lab #2

Three Random Resistors

1.

Color codes: Orange, Orange, Brown, Gold

Stated resistance value: 330 ohms

Tolerance: 5%

Min/max possible resistance:  313.5-346.5 ohms

Actual measured resistance: 334 ohms

2.

Color codes : Orange, Orange, Yellow, Gold

Stated resistance value: 330,000 ohms

Tolerance: 5%

Min/max possible resistance: 313,500-346,500 ohms

Actual measured resistance: 321,400 ohms

3.

Color codes: Red, Red, Red, Gold

Stated resistance value: 2,200 ohms

Tolerance: 5%

Min/max possible resistance: 2,090-2310 ohms

Actual measured resistance: 2,150 ohms
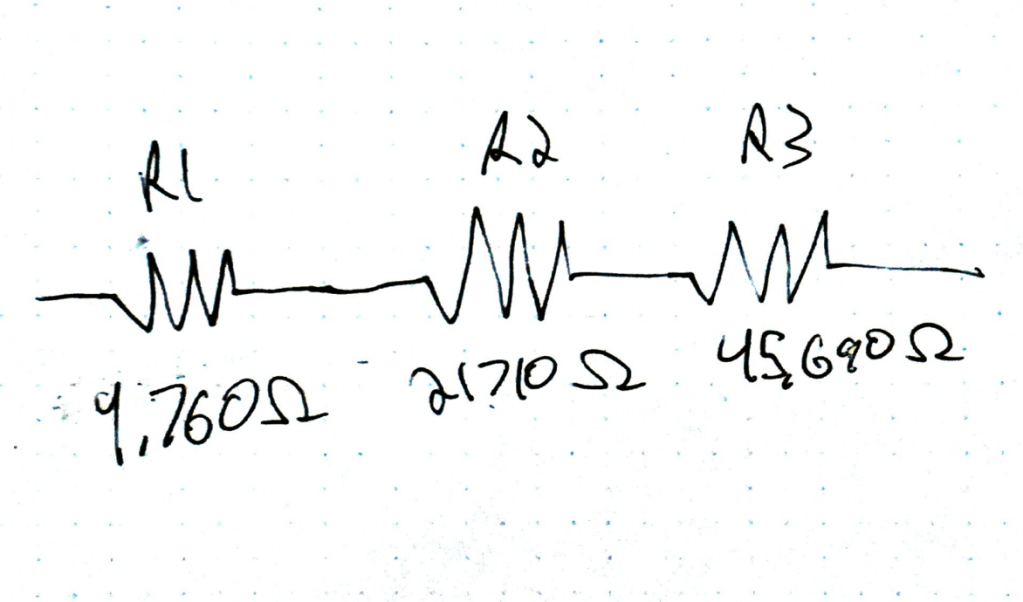
Resistors in Series

1.

Stated Value: 10k ohms

Measured Value: 9,760 ohms

2.

Stated Value: 22k ohms

Measured Value: 21,710

3.

Stated Value: 47k ohms

Measured Value: 45,690

Calculations: R = 9,760 + 21,710 + 45,690 = 77,160 ohms

Calculated Total Value: 77,160 ohms

Measured Total Value: 77,150 ohms

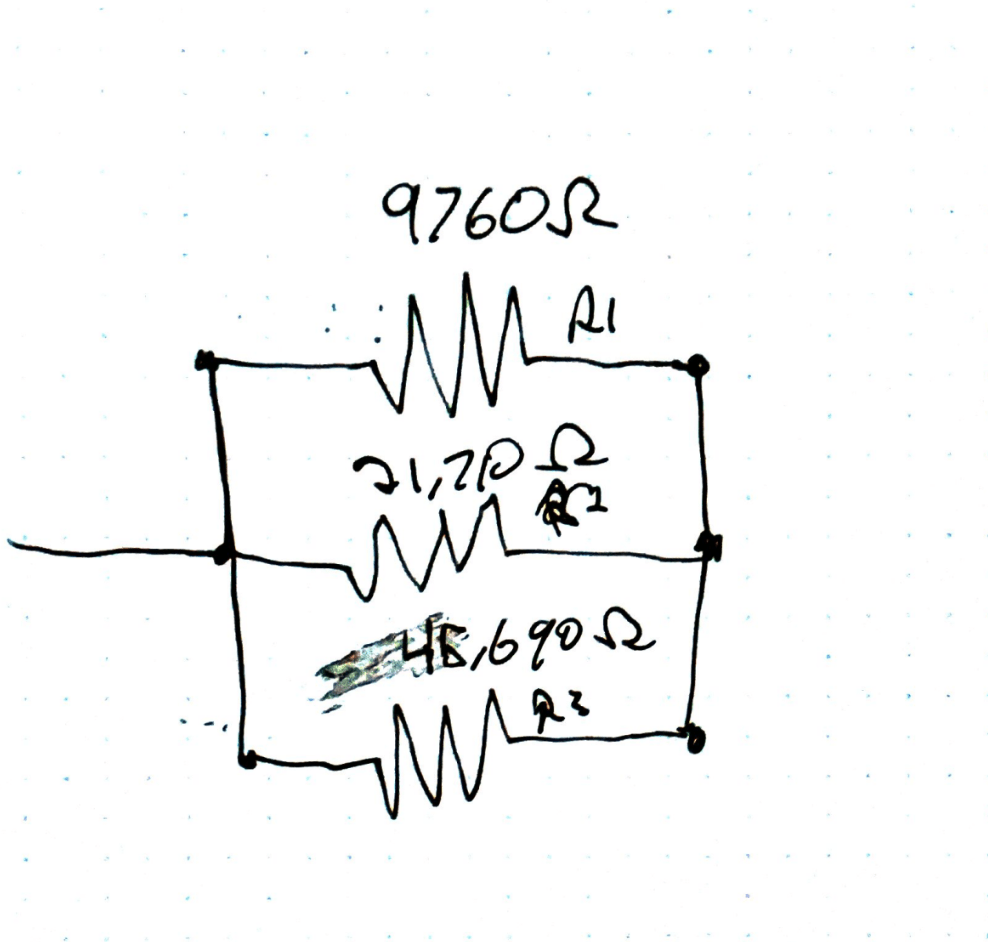
Resistors in Parallel

1.

Stated Value: 10k ohms

Measured Value: 9,760 ohms

2.

Stated Value: 22k ohms

Measured Value: 21,710

3.

Stated Value: 47k ohms

Measured Value: 45,690

Calculations: 1/((1/9760)+(1/21710)+(1/45690)) = R = 5,868.29 ohms

Calculated Total Value: 5,868.29 ohms

Measured Total Value: 5,850 ohms
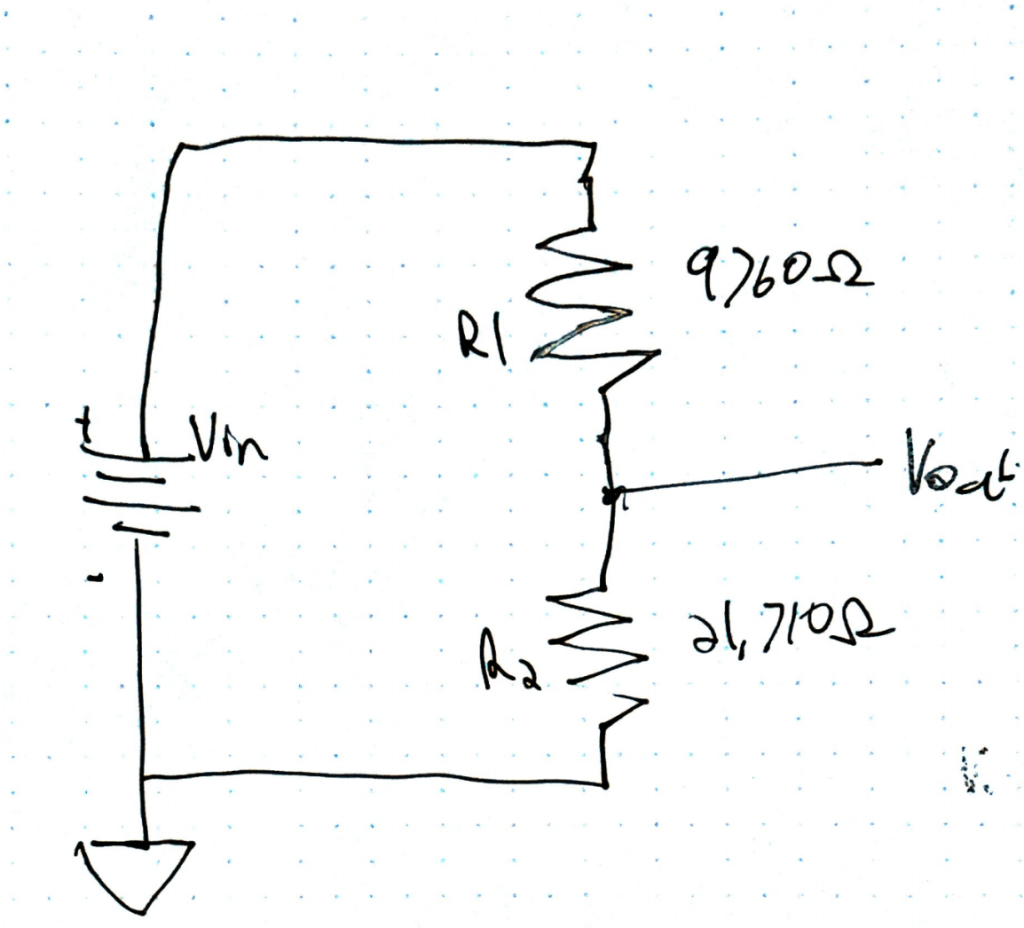
Voltage Dividers

Calculations: Vout = 8.9V * 9,760ohms/31,470ohms = 2.78 V

Calculated Value of Vout: 2.78 Volts

Measured Value of Vout: 2.8 ohms
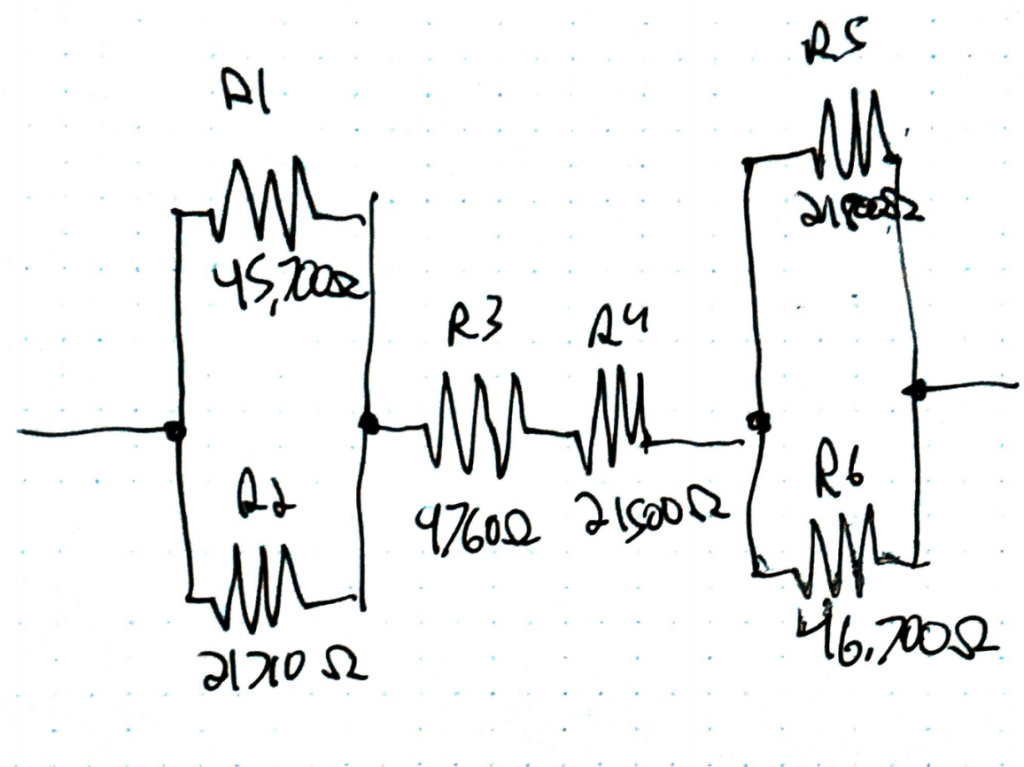
6 resistors

1.

Stated Value: 47k ohms

Measured Value: 45,700 ohms

2.

Stated Value: 22k ohms

Measured Value: 21,710

3.

Stated Value: 10k ohms

Measured Value: 9,760 ohms

4. 

Stated Value: 22k ohms

Measured Value: 21,500 ohms

5.

Stated Value: 22k ohms

Measured Value: 21,800 ohms

6.

Stated Value: 47k ohms

Measured Value: 46,700 ohms

Calculations: R1 = 1/((1/47k)+(1/22k)) = 14,985.51 ohms

R2 = 22k + 10k = 32,000 ohms

R3 = 1/((1/47k)+(1/22k)) = 14,985.51 ohms

R1 + R2 + R3 = 61,971.02 ohms

Calculated Value: 61,971.02 ohms

Measured Value: 60,840.29 ohms
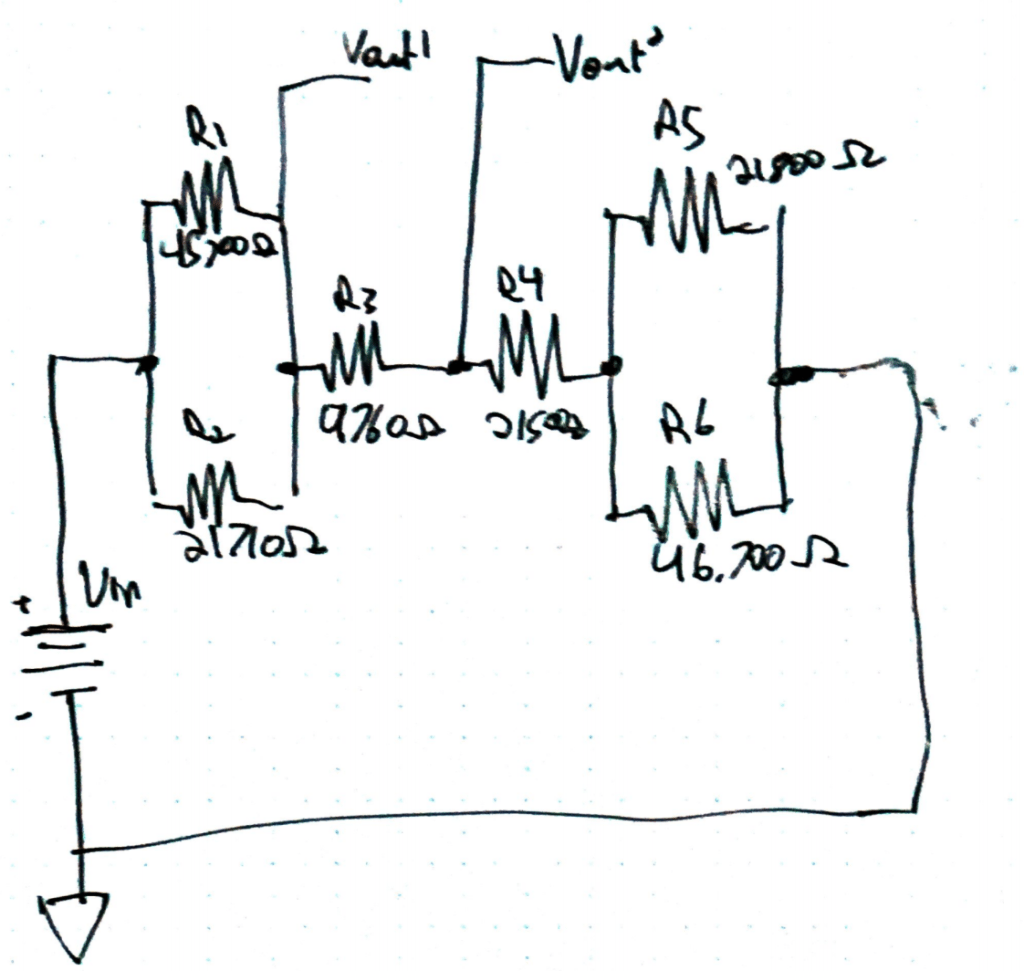
Voltage Dividers 2

Vin

Stated Value: 9 Volts

Measured Value: 8.9 Volts

Calculations: Vout1 = 9 * (46,985.51/61,971.02) = 6.8 Volts

Vout2 = 9 * (36,985.51/61,971.02) = 5.4

Vout1 Calculated Value: 6.8 Volts

Vout1 Measured Value = 6.75 Volts

Vout2 Calculated Value: 5.4 Volts

Vout2 Measured Value: 5.32 Volts

Voltage 1 to 3

Vin

Stated Value: 9 Volts

Measured Value: 8.9 Volts 

R1

Stated Value: 10k ohms

Measured Value: 9,760 ohms

R2

Stated Value: 22k ohms

Measured Value: 21,500 ohms

R3

Stated Value: 47k ohms

Measured Value: 46,700 ohms

Calculations:

V1 = 9 * (9760/77960) = 1.13V

V2 = 9 * (21500/77960) = 2.48V

V3 = 9 * (46700/77960) = 5. 39

Measured Values:

V1 = 1.1V

V2 = 2.5V

V3 = 5.3V

Trouble Shooting

  • I had difficulty seeing the colors on the resistors
  • I had trouble with understanding the different range sets on the multi meter
  • When measuring the values of the resistors, some resistors were touching, which made my first measurements incorrect

LAB #1

Lil’ Lights

How Breadboards Work

A breadboard is a tool used to create and test out circuits. The board consists of two side sections and two middle sections. The side sections consist of two columns divided into sections of 5 holes for wires. Each column allows an electric current through all its section, but it is not connected to the other column, or the other side and middle sections. There are two columns in the side section, one marked by a red line (positive), and one marked by a blue line (negative). The middle sections consist of 63 rows of 5 holes for wires. Each row has allows a current to only flow through that specific row of 5. to connect the holes in the different rows and columns together, you must use wires. to start a circuit, one must connect the negative and positive wires of a battery to the negative and positive columns of the side sections. None of the 4 sections are connected in any way. Start building you circuit!

An error keeps occuring with every method I use to upload the schematics, so I will email you an image of it.

Multimeter

The multimeter is a helpful tool that is used to analyze and evaluate circuits. Multimeters have two wires, one positive and one negative, to test the levels of different aspects of a circuit. If you out the multimeter on voltage mode, it will test how many volts there are in a circuit. If you put it to resister mode, you can test how many ohms of resistance there is. If you put it on current mode, it will test how many amperes of current there is. Knowing these values, you can evaluate your circuit and determine its abilities.

List of Mistakes Made

  • I accidentally bent a wire to the point that it didn’t fit into the breadboard, so I had to cut a new wire.
  • When lighting two LEDs in the circuit, the red LED would light up, but the yellow LED would not, likely because the red was a lot warmer of a color.
  • I had to use two red LEDs
  • The photocell didn’t create as much change as I wanted it to

I did not have many issues during this process.

Inspiring Final Projects

Jillian Olesen: I thought Jillian’s project was really cool. The pedal worked really well and I liked the sound of the effect created. I though adding the filter knob made the sound so much cleaner. I like how she fused art and electronics together to make a very aesthetically pleasing pedal.

Kat McFarlane: This project was really cool because of its surprising output. I was really impressed that the synth had clear tuned polyphonically playable triad chords.

Connor Riley: This project was really cool and inspiring. It was impressive how many effects Connor was able to install into this project, and all the ways to control the effects. I want to make something at this level if I can, and then make it more aesthetically pleasing.

Introduce Yourself (Example Post)

This is an example post, originally published as part of Blogging University. Enroll in one of our ten programs, and start your blog right.

You’re going to publish a post today. Don’t worry about how your blog looks. Don’t worry if you haven’t given it a name yet, or you’re feeling overwhelmed. Just click the “New Post” button, and tell us why you’re here.

Why do this?

  • Because it gives new readers context. What are you about? Why should they read your blog?
  • Because it will help you focus you own ideas about your blog and what you’d like to do with it.

The post can be short or long, a personal intro to your life or a bloggy mission statement, a manifesto for the future or a simple outline of your the types of things you hope to publish.

To help you get started, here are a few questions:

  • Why are you blogging publicly, rather than keeping a personal journal?
  • What topics do you think you’ll write about?
  • Who would you love to connect with via your blog?
  • If you blog successfully throughout the next year, what would you hope to have accomplished?

You’re not locked into any of this; one of the wonderful things about blogs is how they constantly evolve as we learn, grow, and interact with one another — but it’s good to know where and why you started, and articulating your goals may just give you a few other post ideas.

Can’t think how to get started? Just write the first thing that pops into your head. Anne Lamott, author of a book on writing we love, says that you need to give yourself permission to write a “crappy first draft”. Anne makes a great point — just start writing, and worry about editing it later.

When you’re ready to publish, give your post three to five tags that describe your blog’s focus — writing, photography, fiction, parenting, food, cars, movies, sports, whatever. These tags will help others who care about your topics find you in the Reader. Make sure one of the tags is “zerotohero,” so other new bloggers can find you, too.

Design a site like this with WordPress.com
Get started